Table of contents
Before you start
Theme requirements
This theme can only be installed on self-hosted WordPress websites. This typically includes:
- A subscription to a web hosting service.
- A domain name, and
- The free WordPress software installed.
You’ll also need the free Her Money Blog parent theme. You don’t need to activate it, it just needs to be located in your themes folder. It’s included with your purchase and you can also get it from WordPress.org.
Theme Files
After purchasing the theme, you’ll have the following files available to download:
- hermoneyblogpro.zip — zip folder containing the theme. The name might include numbers, which stand for version number and might change in the future.
- hermoneyblog.zip – zip folder containing the parent theme.
- hmbp-data.zip — zip folder with the import data.
- A quick start PDF doc.
✦ TIP: Do not open the .zip archive files – you’ll need to upload it to your WordPress site as-is.
Theme Installation
The simplest way to install a theme is from your WordPress dashboard. Here you can find the step by step instructions:
Installing the parent theme
- Login to your WordPress Dashboard and go to Appearance → Themes.
- Click Add New at the top of the page, and then Upload theme.
- Click Choose file and locate the hermoneyblog.zip file (parent theme) on your computer.
- Click Install Now, but do not activate.
Installing the Her Money Blog Pro theme
- In your WordPress dashboard, go to Appearance → Themes.
- Click Add New at the top of the page, and then Upload theme.
- Click Choose file and locate the hermoneyblogpro.zip file on your computer.
- Click Install Now, but do not activate.
- Click on Activate.
Congrats, your theme is now installed and activated!
Import the demo data
I recommend you to use a fresh WordPress installation for importing demos. While import process will not remove or overwrite any of the existing content on your site, it might make it harder to find and remove it when you’re getting your site ready for launch.
To import example blog posts, pages, categories, and images used in the demo, follow these steps:
- Install and activate the Advanced Import plugin from the plugin directory.
- Go to Appearance → Demo Import.
- Upload the hmbp-data.zip and click Upload Demo Zip.
- Wait for the import process to finish.
- Visit your homepage. It should now show the demo blog posts.
Theme Setup
Set your homepage
Visit Settings → Reading, and under Your homepage displays, select Your latest posts.
Customize your homepage
This theme uses the default block editor (aka Site Editor). You will use the Site Editor to make changes to every aspect of your site’s content and layout. In the Site Editor, you can change your site’s styles, including colors and fonts, homepage and template designs, and edit your website’s menus.
To open the Site Editor, follow these steps:
- Visit your site’s dashboard.
- Navigate to Appearance → Editor.
✦ TIP: If you need extra guidance on how to use WordPress’ built in Site editor, you can check out this official tutorial.
Editing the homepage
To edit the homepage template:
- Visit your site’s dashboard.
- Navigate to Appearance → Editor.
- The preview on the right had side should be showing your homepage. Simply click on it to start editing.
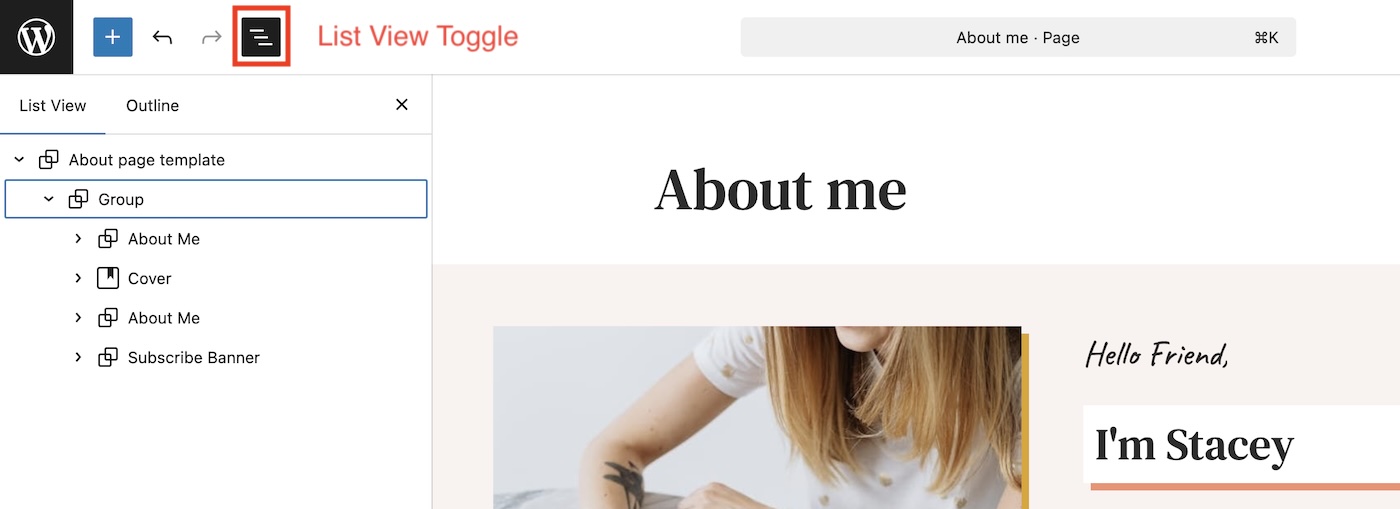
✦ TIP: Turn on List View (recommended) – click the List View icon (top left) to see each section by name. It makes selecting the right part much easier.
✦ TIP: Always save your changes
Click Save (top right). The dialog may list multiple items (template, template parts). Keep them all checked and confirm. Make sure to save your work at regular intervals.
Alternate Blog Home Template
The theme includes two versions of your blog homepage:
- Default, with four featured posts at the top, and blog feed with with sidebar at the bottom.
- Alternate, styled more like a landing page with promo section at the top.
To switch between them:
- Go to Appearance → Editor.
- Click on the website preview on the right – this will open the Editor.
- In the Site Editor, open the Settings sidebar and select the Template tab.
- Open the Design panel and select the design you want to use.
- Save the changes to your template and repeat the process for each template.
Customizing the Blog Posts on the Homepage
The default homepage template displays blog posts in two areas:
- four featured posts at the top, and
- a list of posts with sidebar on the right towards the bottom.
I recommend customizing the featured posts area by picking which posts to show there. You can select based on a specific category, tag, or status (for example, show only sticky posts). Here’s how:
Updating Site Header and Footer
Her Money Blog Pro uses template parts for the Header and Footer. When you edit a template part once, the change applies site-wide (it will be applied on every page that uses it).
There are two ways to edit Header/Footer:
- Edit directly from Template Parts:
- Navigate to Appearance → Editor → Patterns → Template Parts and click on the Header/ Footer pattern on the right.
- Make your changes and hit Save.
- This updates the Header/Footer everywhere it’s used.
- Edit in context (while viewing a page or template):
- Navigate to Appearance → Editor → Templates → Blog Home (or any page template) → click the Header (or Footer) → choose Edit in the little toolbar.
- You’ll enter an “isolated” view of that template part.
- Make your changes and hit Save.
Editing the Header
The header contains Site Title, Navigation and Search blocks. To edit:
- Open Appearance → Editor → Patterns → Template Parts → Header and click on the Header pattern.
- Click the Site Title block → type your website name. This will update your site name site-wide (wherever Site Title block is used and in WordPress settings).
- Save (top right). You may see multiple items to save—keep them all checked.
Setting up the navigation
By default, the header shows a Page List (it auto-lists your published top-level pages).
To keep it automatic: Do nothing. As you add pages, the menu will be updated.
To hand-pick links (custom menu):
- Click the Navigation block (you’ll see the blue outline around the menu).
- In the right sidebar, click on the three vertical dots icon (⋮) and select Create new menu (or select an existing menu if one already exists).
- Click + to add items (Pages, Links, or Categories).
- Drag to reorder and create sub menus.
- Save (top right). You may see multiple items to save—keep them all checked.
Editing The Footer
Your footer combines editable text and two custom navigation menus:
- Site info on the left, including logo, site title, and tagline. Updating any of these elements will create changes globally.
- Two navigation menus on the right. Each item is a custom link. To edit, click on each link and update the Text and Link options in the right toolbar.
- Save (top right). You may see multiple items to save—keep them all checked.
Editing The Sidebar
The homepage, single posts, and the default page templates display a sidebar. All elements of the sidebar can be customized:
- Open Appearance → Editor → Patterns → Template Parts → General and click on the Sidebar pattern on the right.
- This will open the editor where you can adjust the content of the sidebar:
- swap out the copy for your own.
- add links to your own social media profiles in the Social Icons block.
- add more content. You can use any block inside the sidebar, there are no special sidebar widgets.
- the Categories block generates the list automatically, based on the blog categories.
Don’t worry if the width of the sidebar in the Editor is different – it will be right once you save and preview the site.
Customizing Fonts And Colors
Using provided style variations
Her Money Blog Pro comes with additional custom color and font combinations.
There are two ways to access them:
- Go to Appearance → Editor → Styles → Browse styles. Click on the available presets to see the preview immediately update. You can combine a custom color and custom font present (have one of each active).
- You can also access Styles while editing within the Site Editor by clicking the Styles icon at the top-right (the icon looks like a black and white circle split in half).
You can further adjust the colors to match your brand. To do that, navigate to Appearance → Editor → Styles → Colors, and click on “Edit palette”. This will allow you to make global changes to the site’s colour scheme.
Similarly, you can adjust the fonts on your site by going to Appearance → Editor → Styles → Typography. From there you’ll be able to add more fonts, and change the fonts for global elements like headings, text, buttons, etc.
Each time you make a change, be sure to save your progress.
Resetting custom fonts and colors
You can remove all custom styles you’ve applied and return to your theme’s default appearance. This is especially helpful if you want to start fresh. Here’s how:
- Visit your site’s dashboard.
- Go to Appearance → Editor.
- Click the preview on the right to open the Site Editor.
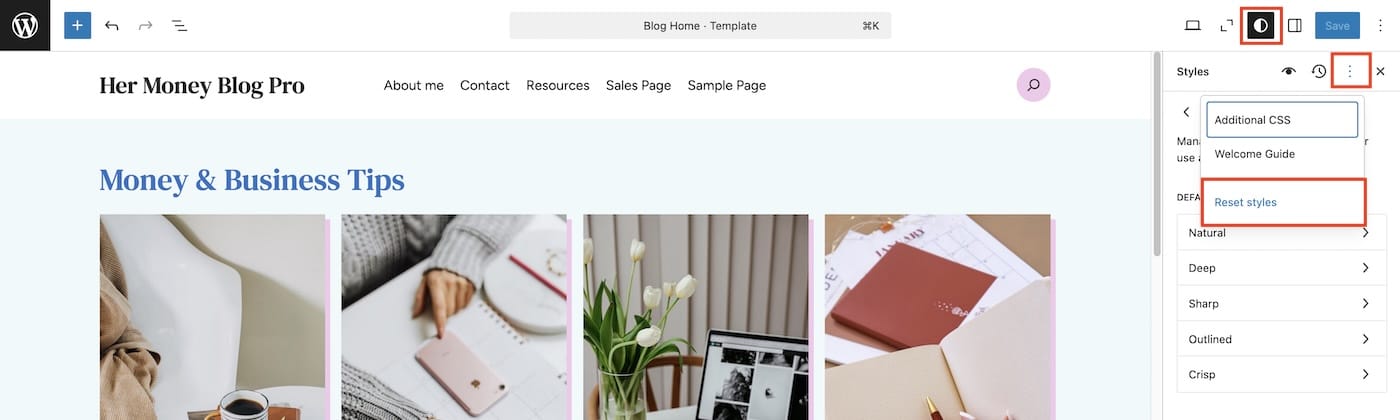
- Click the Styles icon (a black and white circle split in half) in the top toolbar.
- In the Styles panel that appears, click the three dots menu (⋮) and select Reset styles.
This resets all your Typography, Colors, and Layout changes. Only style settings are reset, not changes to content or site settings.
Using custom page designs
Her Money Blog Pro comes with extra page layouts for the following pages:
- About (1)
- Contact (2)
- Resources (1)
- Sales landing page (1)
If you performed the demo import, these pages would have been created automatically, with the correct design and template applied.
Here’s how you can create a page and apply one of these designs manually:
- Create a new page via Pages → Add Page.
- A popup will open showing available page layouts. Pick one of them.
- The layout will look slightly wrong, but we’ll fix it by applying the correct template.
- Add Page title at the top.
- In the toolbar on the right, make sure you’re in the “Page” tab, then click on “Pages” next to Template item.
- This will open a small list of options – pick “Change template”.
- This will open another popup, with only one option on the list (Page No Title) – click on it.
- This will select a special template that doesn’t display page title or the default sidebar on the right.
- Click Save draft near the top right of the screen to save your progress.
- Swap images and text for your own. Click Publish when your page is ready.
Using extra patterns
This theme comes with extra patterns that you can mix and match to create new page layouts or customize the existing ones.
You can see all the custom patterns in one place when you navigate to Navigate to Appearance → Editor → Patterns, under the Featured category.
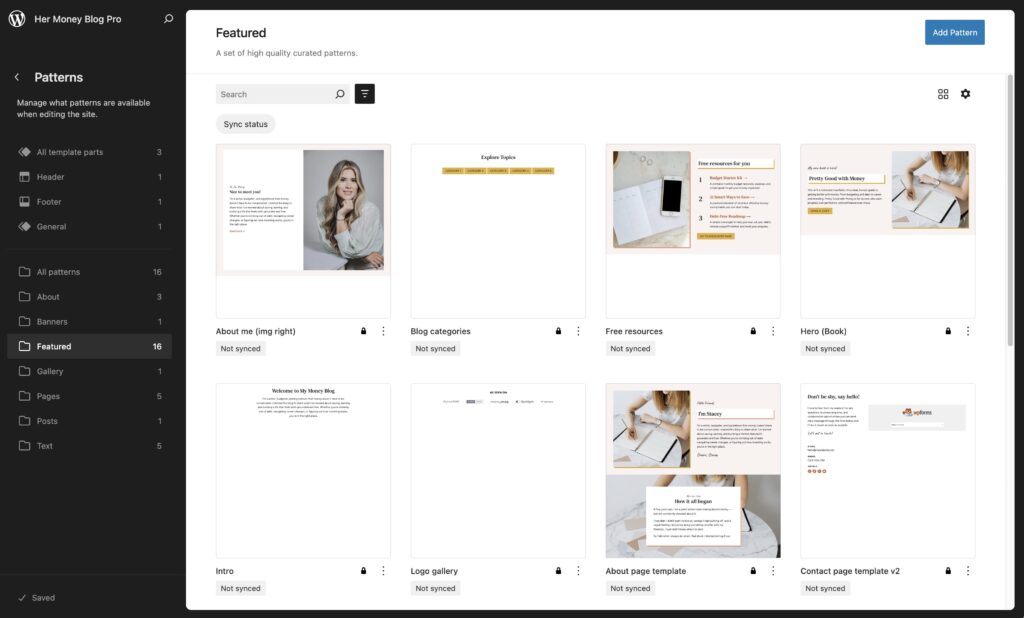
To insert a pattern into a post or a page, on the post edit screen, click on the Add Block [+] button to open the block inserter. From here, switch to the ‘Patterns’ tab to view available block patterns grouped by category. All the custom patterns and layouts that come with this theme will be in the Featured category.
How to add a contact form
The demo site and included contact page templates are using the free version of the WPForms plugin for the contact form functionality.
- Install and activate the WPForms plugin from the WordPress.org repository. You can search for it install it directly from the Plugins section of your Dashboard.
- Once installed and activated, navigate to WPForms → Add New.
- In the template section, select Simple Contact Form.
- From there you can customize the form by adding/removing fields. We added a drop-doown field.
- If you’d like to make the Name and Email fields full width, click on Name and go to Advanced Options → Field Size and switch it to Large. Repeat for Email field (and any additional fields you want to adjust) .
- Click Save in the top right corner of the screen.
- Time to add your contact form to your page! Head to the page/post where you want to add the contact form. If the page is using one of the custom contact page layouts, the WPForms placeholder block is already there. Click on it, and select the Simple Contact form created via the plugin.
- Save draft or publish the page and try out your new contact form!